
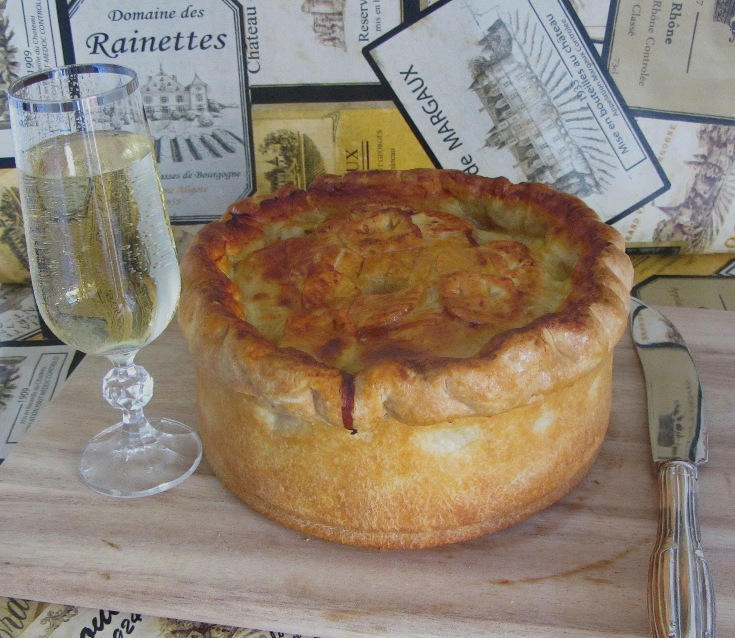
There are some dishes that remain etched on our taste buds forever and this is one such dish for me. The trouble is that this dish is served only in the finest Brassieres in the world and at one point was the pinnacle of a 5 star dining experience, deeming it uncommon to find in a standard restaurant and when you do find it, you must be prepared to spend a pretty penny. I did mention two blog posts ago that we can eat whatever it is we crave no matter how unreachable it may seem because every dish in the world has a recipe and a method. It is simply up to us, humble home cooks to reach for the pan and prepare! Thus far I have not shared with you a savoury dish, saving the special moment to entice you with something profanely delicious and I thought what better way to start than with Pâtè en Croûte.
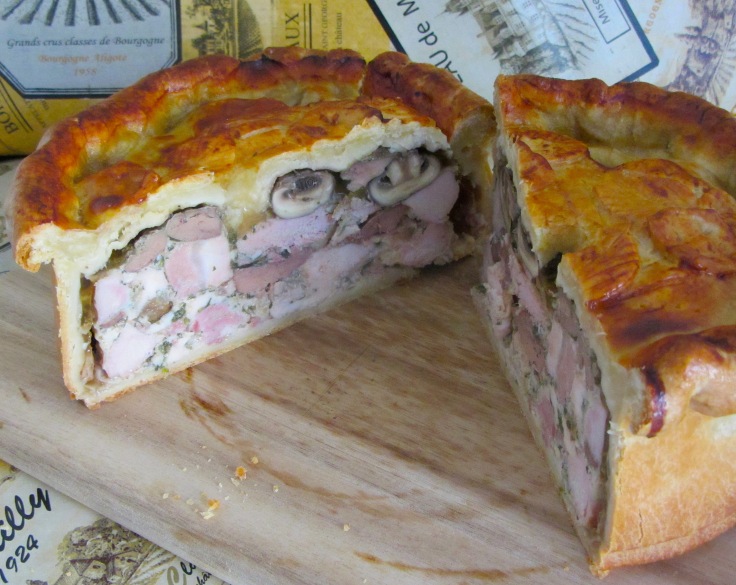
Pâtè en Croûte is a rustic pie that is classically served as an appetiser, pâte refers to a stuffing that is typically made from minced meat, and en croute literally translated from French means in a crust. Ages ago the crust or pastry was made with flour and salt and used to encase the meat which steamed and cooked under the protection of the pastry, with the pastry then discarded before service. Later however, the pie evolved and the pastry became part of the decadence, adding to richness of the whole pie. Basically this is a dish made with a savoury meat stuffing and can take up to 2 days to prepare, but before you lose hope let me just express that this is a pie above all pies and has a stunning reputation. This reigns from dishes that were served to kings and queens because of its sheer luxury. It is filled with layers of meats, herbs and eggs depending on the mood and thereafter set with an aspic to be cut into thin exquisite slices.
This is an act of kindness and consider yourself a benefactor if you plan to make this for your loved ones or special guests. To make it requires time and patience but it is worth every bit of effort as they themselves will tell you once this undertaking is over and everyone’s palettes have been wowed. I chose to share this with you because even though there are many processes involved, it is a wonderful way to learn not just one, but many techniques at the same time, like pastry making. At the risk of being tedious I went ahead anyway and included detailed steps to making the perfect pastry for this type of pie. I find that in pie making, no matter how delicious the filling may be, if the pastry is of a sub standard quality it can let down the entire dish. Therefore, for labours of love such as these it is best to make the pastry from scratch.
Forgive me if I’ve gone overboard in giving you excessive details of the preparation, I did so because it would be my greatest pleasure to inspire even the most amateur cook to attempt this dish. We should never limit ourselves to what our two hands are capable of in the kitchen, with Christmas and New Year almost upon us, consider this pie as a celebratory starter at one of your many festive parties. It’s one that can be prepared days in advance taking the pressure off those special days when time is of the essence. Once you attempt this pie, the sky is the limit and you will be on your way to making your own variations of delicious pies to cheer even the most dispirited of hearts.
Plan yourself, plan your time, read over the notes and the recipe, shop two days in advance and it literally will be as easy as pie.
DAY ONE
For the Pastry (Yields 750g of Dough)
Ingredients
- 450g plain flour
- 150g moderately softened butter
- 1 1/2 tsp fine salt
- 1/2 tsp sugar
- cold milk
Preparation
- In a large mixing bowl add butter and using a butter knife break into pieces.
- Add dry ingredients.
- Using your fingertips start to work the butter into the flour to form crumbs.
- There is no specific measurement given for the milk for the reason that it is not possible to determine the exact amount to get the perfect consistency, it can vary depending on temperature conditions in every home. It should be 50ml or a little more therefore it is imperative that the milk be added slowly and in stages.
- Add drops of milk a little at a time always working the dough with your fingertips.
- Continue adding milk a little at a time until the formation of a dough appears.
- The dough itself will indicate when enough milk has been added. The dough should be able to be rolled into a ball without sticking to the fingers as an indication. If too much milk has been added resulting in a sticky dough add a bit of flour and work again. Although this should not be necessary when using the above technique diligently.
- It is ready as soon as it can be rolled into any shape easily without sticking so it is best to refrain from overworking it. It does not need to be kneaded further.
- Form the dough into a ball, flatten slightly with a rolling-pin, cover with cling film and leave to rest in the fridge overnight.
For the Primary Forcemeat/Stuffing
Ingredients
- 100g diced pancetta
- 300g chicken livers + salt & pepper to taste + 1 tsp lemon juice
- 300g pork shoulder/fillet/loin
- 2 chicken breasts skinned and deboned
- 1 tbs brandy
- 1 tbs port
- 1 tsp lemon juice
- 1 tsp ground black pepper
- 1 tsp salt
Preparation
- Place pancetta in a cold water bath to remove the excess salt.
- Clean and remove membranes from chicken livers by cutting each liver in half making the vein accessible. The vein resembles a thin long string and can easily be pulled out. Remove the vein gently without tearing the liver. Rinse the cleaned liver under cold water. Drain in a colander for five minutes. Season with salt, pepper and lemon juice and combine. Cover and leave to marinate overnight in the refrigerator.
- Slice pork and chicken breast into cubes (not dice). To the cubed meat add the brandy, port, lemon juice, salt and pepper and mix to combine.
- Drain pancetta from the water bath, add to the marinated meats, mix together, cover and place in the refrigerator for 24 hours/overnight.
DAY TWO
Lining The Mould With Pastry
- A loose loaf tin is the suggested mould for this type of pie to ensure that the finished pie can be removed easily without jeopardising the appearance. A special 400mm rectangular mould with herring bone pattern with detachable base and pins is usually used by the finest French restaurants in order to unmould the pie effortlessly and be able to cut the pie into aesthetic slices which shows off the meat beautifully. This mould however can cost up to €80 so I suggest to use 20cm round spring-form tin for this particular recipe. I developed a recipe for a tin of this size, however if making a bigger pie for a larger tin, you may adjust the measurements accordingly. For beginner cooks though, I advise to start with a smaller pie to gain some experience.
- With a knob of butter, grease the tin adequately and dust lightly with flour using a small sieve and let wait in the fridge. By greasing with both fat and flour you are twice eliminating the risk of the pie sticking to the tin after it’s been baked.
- Remove dough from the fridge and leave to stand at room temperature for 20 minutes for it to become pliable again. Divide into 2 portions of 500g and 250g using a reliable scale. Wrap 250g back into the cling film and work only with the remaining 500g. Work the dough for a couple of minutes to form a ball. Lightly flour a work surface and place the dough ball in the centre. Using a floured rolling-pin, press (do not roll) the dough from top to bottom to flatten it slightly. So press, lift the rolling-pin, leave a space and press down again and continue until the surface area of the dough is covered from top to bottom with ridges left by the pressing and lifting motion. Repeat this step 4 times turning the dough each time at 90 degree angles until the dough has come around full circle. Once the dough resembles a flattened disk shape, the dough is ready to be rolled. Begin the rolling process by placing the palm of your hands firmly on sides of the pin leaving a few inches of space from the edge of the pin. This allows for more control of the rolling-pin as well as directing the pressure of the hands acutely. Place the rolling-pin in the centre of the dough and roll upward away from the body, starting once again at the centre, roll downward toward the body. Turn the dough 90 degrees and repeat this step and continue repeating this step until the dough is rolled into a circle twice wider than the mould with a 3cm thickness. By rolling the dough from the centre upward and from the centre downward the dough will maintain a consistent thickness throughout the rolling process. By turning the dough in 90 degree angles, the risk of the dough sticking to the work surface is minimised. If the dough sticks to the work surface flour can be added but it is not beneficial to the dough to have a very heavily floured work surface therefore the rotation of the dough is key, when using the rotation method it is highly unlikely that the dough will stick. When the dough has been rolled out wide enough roll the entire dough onto the rolling pin. Lift the rolling pin with the dough attached, place into the mould and roll out removing the rolling pin. By using the rolling pin to lift dough, the dough will not run the risk of breaking like it would if one were to lift the dough by hand. Use your fingers to gently push the dough into the mould. Thereafter break a small piece of excess dough from the edges, dip in flour and use it to press the dough down into the mould to prevent tearing or fingerprint indentations. Leave a 5cm overhang and using a pair of scissors cut the excess off neatly. Cover with a damp kitchen towel and let wait in the fridge. Take the remaining 250g of dough and press and roll out repeating the same technique as above to make a cover for the pie. Ensure that the cover is rolled out with a thickness of 3cm and a circumference wider than the mould to allow for an overhang which will be neatened later. Wrap and place in the fridge. Keep any extra dough for decorations of your choice.


For the Secondary Forcemeat/Stuffing
Ingredients
- 250g brown button (chestnut) mushrooms + 1 tbs butter + 1 bay leaf + 1 sprig thyme
- 1 large onion + 1 tbs butter + 1 tsp olive oil
- 2 eggs + 10g chopped parsley
- 1 tbs butter + 1 tsp olive oil for frying chicken livers
Preparation
- Trim mushrooms by slicing off the stalks at the base of the head. Do not pull off the entire stalk. Clean by wiping with a paper towel, or rinse quickly under lightly flowing water. Water is not good for mushrooms so ensure that if rinsing them, to pat them dry. In a saucepan add butter over a medium heat. When the pan is fairly hot add mushrooms, bay leaf and thyme. Sprinkle salt and pepper to taste. *Sautè for 4 minutes only tossing to brown all sides. Keeping mushrooms in the hot pan will continue to cook them causing them to shrink so place into a bowl and set aside to cool.
- Remove chicken livers from the fridge. Place a pan with butter and oil onto a medium heat. When the pan is sizzling, sautè livers for five minutes, toss to brown all sides, place in a bowl and set aside.
- *Chop onion into small dice and cook on low heat with olive oil and butter. Sprinkle with salt and leave covered to continue to cook for 15 minutes to make a *confit. Set aside to cool.
- In a large mixing bowl beat eggs with salt and pepper to taste and add chopped parsley. Remove primary forcemeat from the fridge, add to the egg marinade and stir to combine.
- Add cooled onion confit to primary forcemeat mixture and combine.
Assembly
- Remove lined mould from the fridge and leave to stand for 10 minutes. This will make the pastry more pliable. Do not let the pastry stand at room temperature for more than 10 minutes, this will allow the pastry butter to melt making it difficult to work with as well as altering the flakiness.
- Place half of the primary forcemeat into the bottom of the mould.
- On top of that arrange half of the liver and scatter with some mushrooms.
- Add the remaining forcemeat.
- Top with the remaining liver and mushrooms.
- Place the pastry cover on top.
- Brush the overhang of pastry from the mould and the overhang from the cover with water and join together pressing tightly.
- Using your fingertips roll the edges into the pie to make a thick boarder of crust.
- Beat an egg to make an eggwash and brush the pie generously.
- *Score the cover to your liking using a tip of a small knife or blade.
- Cover with pastry decorations of your choice and brush again with egg wash.
- Make two chimneys to allow the steam to pass out of the pie by making two holes on the pie cover with two round pastry tips and keep them there to guide out the steam.


Baking & Cooling
- Bake in a pre-heated oven on the centre rack at 140°C gas fan / 160°C electric fan / 180°C conventional for 1h15 minutes until golden brown.
- To obtain a crisp crust and golden brown colour remove the pie from the oven after the full bake, brush over with eggwash and place in the centre rack of the oven under a hot *broiler for 4 minutes only.
- Remove pie from the oven and allow the pie to cool completely at room temperature without removing the mould before the next step.
For the Aspic
Ingredients
- 250ml of meat stock (see notes)
- 12g of gelatin sheets (6)
Preparation
- Hours later when the pie has completely cooled the *aspic must be made and filled into the pie. For this, the pastry tips can multifunction as a funnel to guide the aspic through the pie. Or as a quicker alternative the pastry tips can be replaced with a funnel.
- Soak gelatin sheets in a bowl of cold water for ten minutes.
- Bring meat stock to a simmer and before it reaches the boil squeeze out the water from the gelatin sheets, add it to the hot stock and stir until all sheets have dissolved completely. The heat from the stock will immediately melt the sheets to form a strong gelatinised stock (aspic).
- Before the aspic begins to cool and set it must be funneled into the pie immediately.
- Using the spout of your pot pour the aspic into the pie delicately through the funnel ensuring that it is going in and not standing inside the funnel. If not using a pot with a spout, transfer aspic into a jug before filling the pie.
- If the aspic is struggling to go in, make another chimney on the pie cover to help it along.
- Once the pie is indicating that it is full and can not take any more, the aspic will begin to rise through the holes, at this point enough aspic has been added.
- Set the pie in the fridge overnight.
DAY THREE
On the final day you should start feeling excited because you have accomplished a dish wholly made by hand. You have used the finest ingredients, traditional time-honoured methods and techniques and most of all, loving patience to produce nothing less than a dish that is served in the best eateries in the world. Congratulations!
This pie is best served cold and can keep up to a week or more in the fridge provided that it is covered well. Once the pie has been unmoulded it can be placed back into the fridge until ready to serve. This small pie will comfortably serve 12 people. Traditionally it is an appetizer course served before a main meal with a small side of salad greens or pickles or alternatively it can be served as a main dish with accompaniments of vegetables and gravy. Whatever you choose to do my best advice is to cut the pie into slices and not wedges even though we have a round pie. Starting from the top and making a straight downward cut with your knife splitting the pie into 2 halves. The halving of the pie will show off the meat and mushroom layers beautifully to give you not just a tasty plate but an appealing one. Work with the first half of the pie by cutting generous slices. The first 2 slices from each half will be long and can be halved again to serve 2 people. However this is merely a preference, ultimately the choice is yours.
Bon Appétit!
 Maestros Need to Know

*The word sauté  comes from the French sauter, “to jump”. The jumping describes the constant motion of the food in the pan, which is caused by constant stirring and/or shaking the pan. It is also refers to food that is cooked or browned in a pan containing a small quantity of butter, oil, or other fat. Remember that when browning mushrooms to use a pan large enough to hold the mushrooms without crowding them. Mushrooms have a high water content and will not brown if they are crowded as they will lose too much water and start to shrink. The best way to sauté mushrooms is to ensure the pan is large, hot and the fat is almost smoking before putting in the mushrooms. Toss them or shake them to brown adequately.

*When chopping an onion into small dice it is best to peel and trim the top and bottom, slice the onion in half along the top/bottom axis. then turn each half flat side down, and make a series of cuts parallel to that top/bottom axis. Make them as close as you want. Then make a series of cuts perpendicular to the top/bottom axis, spaced similarly to the previous parallel cuts. To save tears it's best to use a sharp knife that will not puncture the onion releasing its volatile oils into the air and into the eyes. You may also run your knife under cold water from time to time.

* Confit is any type of food that is cooked slowly over a long period of time as a method of preservation and comes from the French term confire which means to preserve. In the case of the onion confit made in this recipe it is best to cook the onion with a bit of butter and oil, this mix stops the butter from burning. Cook with the lid covered over a low heat until medium brown to create a perfect confit to add to the forcemeat.

* Aspic is a jelly made from meat stock. Traditionally meat stock made from meat bones contains natural gelatine in the form of collagen and was the only form of gelatine used in ancient times. Nowadays however if not using a home made meat stock, gelatine sheets may be added to meat stock that is store bought. The aspic in this recipe is used to not only hold the meats together but to add a delicious depth of flavour.

*Scoring means make shallow cuts on the surface of meat, fish, bread or cakes. The scoring has several purposes, such as decorating the food, tenderizing, to aid in the absorption of flavor when marinating, and to allow fat to drain from meat while cooking. Cakes are scored to indicate where the cake should be cut without actually cutting it. Pastries are scored most commonly to decorate. For this recipe you may score the cover of the pie but be careful not to go too deep and slit the cover. Work delicately.

*Broiler refers to the grilling element on the roof of the oven used to grill or brown dishes under intense heat.


Let’s see what you will have to say when you eat it 😊
LikeLike
Impressive
LikeLiked by 1 person
Thank you very much. 🙂
LikeLike
You are very welcome 🙂
LikeLike
😊 thanks Nero. Keep this in mind for Christmas.
LikeLike
Niv .. Omg I love this recipe .. Can see all the love for cooking that goes into making this pie Looks beautiful and delicious .cant wait to try it . Thanks Niv for sharing .
LikeLiked by 1 person
Stupenda ricette, grazie. ★★★★★
LikeLiked by 1 person
It looks like Italian Torta Rustica but without the ricotta or is my mistake? But is beautiful anyway.
LikeLiked by 1 person
Aww 💜
LikeLike
Beautiful and detailed recipe, You surprise me every day more
LikeLiked by 1 person
Courtney it’s great to hear from you and thanks so much for following. I’m so glad to know that you want to try it out, let me know how it goes. It is amazing, and I know you’ll appreciate it, I would love to share it with you 😊
LikeLike
Wow, this recipe looks great nivash, must have tasted great too. I don’t think I’ve ever seen such a full pie before, totally yummy, Can’t wait to try it out.
LikeLiked by 1 person